Table of Contents ×
- 1 Tip #1. Prepare Your Approach
- 2 Tip #2. Prepping the Assets for Your Video
- 3 Tip #3. Become a Storyteller
- 4 Tip #4. Focus On The Quality
- 5 Tip #5. Select the Perfect Music and Sound Effects
- 6 Tip #6. Create & Maintain an Efficient Workflow
- 7 Tip #7. Learn Keyboard Shortcuts
- 8 How to Edit Your Video to a Professional Standard
- 9 Begin Editing & Enjoy Your Video
As someone who’s spent the past few years helping brands produce explainer videos and marketing content, I’ve seen firsthand how powerful a well-edited video can be.
Time and time again, I’ve watched raw footage transform from scattered clips into compelling stories in the editing room.
One thing I’ve learned lately is that people don’t want to dig through walls of text or sit through slow intros.
They want clarity, emotion, and value as quickly as possible. That’s where editing becomes the make-or-break moment in your production process.
It goes beyond trimming out dead space or adding slick transitions.
A great edit shapes the rhythm of your story, emphasizes key moments, and keeps viewers locked in until the very end.
I’ve worked on projects where the initial footage felt flat, but once we got into the edit (tightened the pacing, added sound design, refined the flow), it became something that genuinely moved people.
So, how should you edit your video to make it eye-catching and highly engaging?
Roll up your sleeves! We’ll explore seven essential tips every beginner should know.
Tip #1. Prepare Your Approach
In my experience, the most effective editing sessions happen when there’s already a roadmap in place.
This not only saves time during editing but also helps you spot potential gaps early on.
Planning also allows you to identify what tools you’ll need to bring the vision to life.
Are you adding motion graphics? Will you need audio mixing or color grading features?
Knowing these things up front helps you choose the right software for the job.
In this section, I’ll break down the discussion into three parts: choosing the right software, preparing your hardware, and visualizing your final output.
Choosing the Right Software
I always share three practical tips with clients when they’re choosing their editing software:
Define your goals: Are you creating short social videos, explainer videos, or long-form content? The type of content you’re producing will determine what features matter most, like motion graphics, color grading, or audio mixing.
Know your skill level: Some software offers more advanced capabilities but comes with a steeper learning curve. Others are beginner-friendly but more limited.
Stick to your budget: Free software can work for simple edits, while premium options offer more power and flexibility. It all depends on what you need.
To keep things simple, let’s focus on two industry-standard tools based on your operating system:
- Adobe Premiere Pro CC
Premiere Pro is arguably the best video editing software for Windows PC. It has most of the features you’re going to need, from adding a simple text overlay to multi-camera and 3D editing. Premiere Pro has no video track limit, allowing you to import as many clips as you want into your library. - Final Cut Pro X
If you’re an Apple user, this tool is likely to be a better choice for you than Premiere Pro CC. Final Cut Pro can seamlessly integrate with other Apple devices, so you can easily access your iTunes and photos while editing your clips.
Just in case you want to try out other video editing tools aside from those two, this handy table from Filmora Blog should be useful for you.
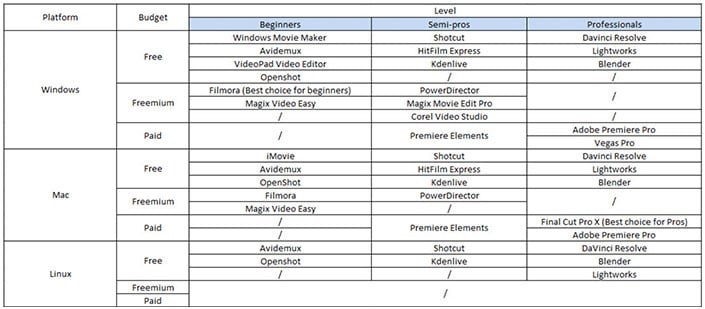
We’ve curated a far-reaching list of video editing software with their features and prices. You can check them out at The Complete List of Video Marketing Tools.
Prepare Your Hardware
Your best-fit software might be taking up lots of space on your disk. The next question is, how can you optimize your hardware?
#1. Close All Other Programs & Applications
Closing other programs and applications will free up a considerable amount of memory and cause less strain on the CPU.
Forgotten programs and applications are going to use a lot of space that your editing software needs.
It’s essential to make some more space for the software so you can enhance your device’s performance and edit more effectively.
#2. Opt for SSD
SSDs (Solid State Drives) have access speeds of 35-100 microseconds (compared to HDDs of 5000-10000 microseconds), which makes this storage drive virtually 100 times faster.
Remember, SSDs don’t make your video editing process any more powerful, but they make it way quicker.
#3. Improve your RAM
The more space you have on your RAM, the more you can speed up your video editing efficiency.
You’ll need at least 8 but preferably 16 gigabytes of RAM. So, make sure to keep your system resources improved and enhanced.
#4. Get the Recommended Video Cards
Video cards allow you to create online videos with extremely high resolutions (4K and 1080p) and make the entire editing process less time-consuming.
AMD and Nvidia are just the two most commonly used brands in the graphics card market, so you can either go for an AMD or an Nvidia graphics card.
#5. Get a Premium Processor
One of the most crucial components of a computer for video editing is the processor. The faster your processor is, the faster your render times will be.
In this case, ensure that you purchase the best processor you can afford. Intel Core i7 is one of the most popular processors among professionals.
#6. Get an External Hard Drive
If you don’t have enough space in your computer for internal drives, then you need an external drive.
With an external drive, you’d be able to do the editing process more easily and, above all, faster.
So, you don’t need to waste half an hour or so every day just on file transfer.
#7. Use a Gaming Mouse
Most video editors rely on the keyboard to navigate the software.
However, the gaming mouse seems like a smart optional solution, eliminating the need to stretch your hand to push buttons on your keyboard every time.
To help yourself get comfortable, consider opting for a gaming mouse like the Logitech G502 or a similar model that offers the same level of flexibility and comfort.
Visualize Your Final Output
There are some high-performing types of video that most video editors produce to achieve their particular goals.
Do they like professional or just-for-fun videos? This question helps you visualize your final output more clearly.
Below are some popular types of online videos to help you visualize how your video will take shape.
- Vlogs. This type of video has become mainstream on video-sharing platforms like YouTube. Since it’s a mostly casual, non-formal video, the editing process should be more flexible with some humor involved.
- Music videos. Often, music videos require professional editing, as some people believe it’s a mix of commercial and artistic elements. High-resolution footage balanced with fine-tuned music can get loads of views and higher the chances of making it go viral.
- Explainer videos. There’s no video better than explainers when it comes to explaining things. With narrative-driven stories and sometimes endearing animated characters, even complex ideas can be broken down into smaller chunks. Ensure the script is as concise as possible to simplify the editing process.
- Product demo videos. A product demo video is an effective way to demonstrate how your product benefits customers. It’s crucial to capture some details and get excellent footage to highlight your product’s appearance and features. To inspire you, here are some of the best product demo video samples you can watch.
- Behind-the-scenes videos. This type of video reveals the beautiful chaos in video production. Most of the behind-the-scenes videos are made from as much footage as possible. However, there are also behind-the-scenes videos that only use time-lapse without any narrative (just background music) and some headlines.
Tip #2. Prepping the Assets for Your Video
The editing process is only as smooth as your preparation. That’s a solid lesson I’ve learned so far.
Whether you’re working solo or with a team, having all the necessary assets organized beforehand always saves time and stress in post-production.
Film More Than You Think You’ll Need
Here’s a golden rule: always shoot more footage than you plan to use.
Even if I’m working on a 2-minute video, I usually capture way more than that during filming.
In practice, I often find that certain shots don’t work as well as expected once I start editing.
Maybe the framing feels off, the lighting isn’t consistent, or it just doesn’t fit the flow of the story.
Having extra footage gives me options to play with and opens up creative possibilities I wouldn’t have seen otherwise.
Besides raw footage, I always make sure I’ve prepared two crucial assets: a storyboard and the voiceover (if I’m using one).
Create Storyboard
Before I begin cutting footage, my team and I always sketch out a simple storyboard, nothing fancy but enough to visualize the video’s structure.
A storyboard lets you course-correct before you waste time editing scenes that won’t land.
I’ve avoided countless headaches by catching mismatched scenes or unclear transitions during storyboarding, rather than halfway through the edit.
Record Voiceover
If I’m using a voiceover, I always record and finalize it before touching the timeline.
This way, I can build my video around the rhythm and tone of the narration, rather than forcing visuals to fit later.
In a nutshell, having the audio track ready upfront can help you:
- Time cuts and transitions more naturally
- Choose clips that match the emotion or emphasis of the narration
- Avoid unnecessary rework if the pacing changes
I also clean up the voiceover file (trimming silences, removing background noise) before dropping it into my editing software.
It’s a small step that saves a lot of time during assembly.
When these elements (footage, storyboard, and audio) are ready before editing, everything else falls into place more smoothly.
Tip #3. Become a Storyteller
At its heart, video production has always been about telling a story. That’s what makes a video powerful.
Visual storytelling taps into how we naturally process and retain information, allowing you to communicate complex ideas more effectively and emotionally.
In my experience, the best-performing videos (whether they’re onboarding videos, tutorials, or brand promos) all share one thing in common: a clear, well-paced story.
This is where storytelling becomes intentional.
I’ve learned to pay close attention to the small details that guide the viewer’s experience.
When you edit with the story in mind, you’re designing a journey for your audience.
One that resonates, informs, and sticks with them long after the video ends.
Tip #4. Focus On The Quality
A high-quality video tends to impress viewers right after they click on the play button.
Today, even with your smartphone’s camera, you can take a crystal-clear video with high quality and resolution.
In this case, video editing plays a vital role in making the video look more professional and crisp, rather than keeping it raw.
So, it should come as no surprise that most software nowadays focuses on high-quality video production.
To help you improve the quality of your video in the production room, below are some handy, actionable tips for it:
Stabilize Using Plugins And Tools
Shaky footage, which can occur due to trembling hands or a lack of proper gear to stabilize the camera, can disrupt the viewer’s experience and lower the video quality.
That’s where video stabilizer software comes in handy —to help you fix shaky footage.
Most popular video editing software offers stabilizer features, such as Final Cut Pro, iMovie, Pinnacle Studio, and more.
Colors Contribute
Color is a critical element in visual storytelling. It conveys meaning beyond what your viewers see on screen.
It helps you describe objects, express emotions, and evoke responses from others.
Fine-tuned color subtly shifts the mood and tone. It makes your shots look as if they were viewed through the human eye.
In the video editing process, the perfection of color is mostly done through color grading or color correction.
Less Is More
The overused phrase “less is more” has never been more accurate than when editing video.
You might think that the more you edit, the more epic the final cut will be.
That’s not true. Indeed, there are a million things that you can do for video edits, but less is more.
Don’t overdo it; keep only the essentials. An over-edited video tends to be too pushy and confusing.
Another video editing tip to consider for making your online video simpler yet elegant is using graphics in your titles.
Use Simple Graphics On Your Titles
Your video title is what your viewers see when they first find your video, and adding it to your video provides viewers with more context.
Consider also including simple graphics or animation to make your title more appealing to encourage more viewers to click on your video.
Use B-Rolls When Shooting Your Footage
If you’re looking for a quick, effective way to make your final cut more exciting, adding a b-roll, or extra shots, can definitely help.
Incorporating B-roll into your videos allows you to enhance the production value and give it a professional polish.
B-roll footage is the secondary video footage shot outside of the main footage (A-roll).
It’s used to enhance the A-roll footage, bolstering the story and creating more cinematic scenes.
Also, throwing in some B-roll is such an excellent video editing technique for cutting out the unwanted bits you have from the A-roll.
Tip #5. Select the Perfect Music and Sound Effects
At its heart, video is a combination of pictures (moving images) and audio (music and sound effects), which should balance each other out.
However, background music and sound effects are often overlooked elements by editors.
In fact, it can make all the difference and significantly impact the quality of the video.
Leveling Background Music
Relevant background music emphasizes what’s on the screen and is used to indicate mood.
It makes it easier for you to evoke the viewers’ emotions. Therefore, it elevates your video dramatically.
Make sure the background music is slightly quieter (the appropriate range is approx. 40 decibels) than your narration (approx. 64 decibels).
Speed Ramping
You can use speed ramping to speed up or slow down portions of the audio.
Speeding up and slowing down your background music or sound effects can bring an entirely new feel to your video.
Tip #6. Create & Maintain an Efficient Workflow
Video editing is a complex task that consists of many smaller components.
A workflow acts as a roadmap for your team, guiding them toward the finish line and ensuring that everyone is aligned.
Let’s start with organizing your files.
Most editors find it challenging to keep their files efficiently organized. So, it’s easy to get files misplaced.
Actually, it’s necessary to label your data and organize it into folders to keep your sanity, speed up the whole editing process, and work more efficiently.
Tip #7. Learn Keyboard Shortcuts
Mastering your chosen software and learning all the keyboard shortcuts for editing makes your editing process seamless and efficient.
It helps you perform repeated actions, such as playing footage, zooming, inserting, trimming, and more, at your fingertips.
A Glance at Cheat Sheets
Being a pro in keyboard shortcuts isn’t just a party trick to impress your team members.
It’s a way to a more efficient editing process, which makes you more of an asset as a video editor.
Most popular video editing software (such as Adobe Premiere Pro, Final Cut Pro X, iMovie, and more) has a keyboard shortcut cheat sheet you can learn.
Taking extra effort and time to learn them will save more of your precious time.
Invest In a Keyboard
If you have enough budget for the editing process, consider investing in keyboards specifically designed for video editing.
Here are some of the best-selling video editing keyboards you might want to purchase:
- Final Cut Pro X Keyboard
- Avid Media Composer Keyboard
- Adobe Premiere Pro CC Keyboard
- Sony Vegas Keyboard
- Edius Keyboard
- After Effects Keyboard
- DaVinci Resolve Keyboard
How to Edit Your Video to a Professional Standard
Now that you have everything you need already prepared, it’s time to start putting together your marketing video like the pro you are.
To give you a glimpse of the process, here’s how Breadnbeyond typically edits our videos.
Start a New Video Editing Project
First things first, no matter what software you use, you’ll have to make a new project to import the clips you’re going to use.
This step is pretty basic. As long as you’re computer literate, you should be able to do this.
Software like Adobe Premiere Pro CC allows you to add as many clips as you want, basically unlimited.
However, some free software might be more limiting in the space you can use within a project.
Pro tip: It’s always a good practice to watch your footage a few times to make sure that they are good enough to be included in your video.
Remember, if you’re making a video for your company, it has to look professional and well-polished.
Having a low-quality clip, both in terms of resolution and content, can negatively impact your brand.
Organize Your Footage to Tell a Story
The next step is organizing the clips you’ve shot and imported to create an enjoyable story. It’s okay to drop the shots that you think aren’t good enough to be included in the video.
Depending on the software you’re using, your shots are usually arranged by the order you import them.
Organize your shots by moving them around or naming them accordingly (e.g., Intro, Outro, Filler, etc.) to make it easier to spot which clip is which.
Modern video editing software, such as Final Cut Pro and Adobe Premiere Pro, typically features a ‘timeline’ that enables you to place marks at specific points in your video.
Use this feature to pinpoint the exact frames that you want to emphasize, where you want to cut your clips, or maybe where you want to add transitions or effects.
Start Cutting and Assembling Your Videos
Once you’re done marking important frames, it’s time to start putting your videos together.
This step is simply about cutting and ‘sewing’ clips together to tell an engaging story that’ll keep viewers glued to your video.
This is where the timeline we were talking about earlier comes into play.
The timeline is exactly what it sounds like; it’s a long line that indicates where your video starts and ends.
You can rearrange your clips to create a better arrangement.
Trimming Your Story
Once you’ve managed to make a story emerge from the clips you’ve shot, it’s time to make everything more concise and to the point.
Whether you realize it or not, your video is still too fluffy.
This part is where you make sure that every frame in the video serves a purpose.
As Marie Kondo says, if the frame doesn’t spark joy, throw it out.
Add Transitions to Your Video
Once you’ve cut everything down to only the necessary, it’s time to spice up your video with some cool transitions.
Now, when I say cool, I don’t mean exaggerated transitions like the ones you see in tacky TV commercials. We both know that your brand is more than that.
Simple transitions like swipe, fade, and even jump-cuts should be enough as long as you put them in the right places.
Each transition effect creates a different mood for your video, so try them out one by one and see which one works better to be a bridge between scenes.
If you’re feeling extra creative, you can play around with your shots to make jaw-dropping transitions like this:
But keep in mind that transitions aren’t what builds your brand 😉
Final Touch-Ups
Now that your timeline’s clean, your story’s trimmed, and your transitions are done, it’s time to do the final touch-ups to make your video more effective.
In order to make your video look professional, you can’t skimp on the visual aesthetic department.
The color palette, shot compositions, and framing is skills that you can’t master instantaneously.
In the meantime, the videos that you just put together will have to do the job. Filters and color grading are your best friends in touching up your final video.
– Filters and Color Grading
There are plenty of web-based apps that can add a filter of your choice to your video in one click. Here are some of them:
- Filter.Video
- Kapwing
- Veed.io
However, if you prefer using something custom and more unique, you can always opt for color grading.
Color grading is essentially an effort to tune and tweak the colors in your frames to build a certain mood.
– Effects, Text, and Motion Graphics
Treat effects, on-screen text, and motion graphics as the garnish to finish up your video.
Also, be prepared to spend WAY more time on making effects (if you plan on doing so) – because even the simplest effect can take some time to perfect.
Mixing Sounds and Background Music
Sounds are an important factor in shaping the mood of your video.
That said, having background music that is too dominant could pull away from the overall message of your video rather than amplifying it.
Here at Breadnbeyond, we always use a subtle undertone as the background whenever we make explainer videos on something technical.
We do this to make sure that the music doesn’t distract the viewer from the main subject.
Pro tip: use intro and outro tracks as, for lack of better words, the bookends for your video.
Doing this gives off a clear message when your video begins and ends. Plus, it makes the video feel more complete.
Rendering, Exporting, and Publishing Your Video
Now that you’ve finished touching up your video, it’s time to output it.
Depending on the technical specification of your videos (e.g., resolutions, framerate, and amount of edits you put into it) and the computer you’re using (CPU speed, GPU speed, and RAM capacity), rendering could take anywhere from minutes to hours.
So, to be safe, don’t start editing your videos too close to the deadline. After it’s finished rendering, you can export the video to consumable formats like .mp4, .avi, or .mkv.
Once that’s done, you can publish them to your preferred marketing channel.
Begin Editing & Enjoy Your Video
The video marketing landscape is only getting louder and louder each day. More than 300 hours of video are uploaded every minute on YouTube alone.
Now that the internet has become a block place with video content, it’s crucial to learn some basic video editing tips for beginners and small businesses with a shoestring budget so that your video stands out.
Editing videos, especially for non-professional and non-tech-savvy people, could be a real challenge.
Not only does it take time to get used to the technical know-how for the editing tools, but the video shooting itself also has a learning curve that’s not easy to conquer.
However, if you’re doing your video, chances are you’re running a startup or a small-scale business.
You probably have to deal with marketing strategies, meetings with clients, project revisions, and budget allocations.
At the end of the day, you’ll have a full-course headache.
Consider hiring professional video editors, such as Breadnbeyond, to free yourself from all the hassle. We know the technical stuff, we know how to make videos, and you have the brain to point us where to go.
Here, at Breadnbeyond, we can help you with all the backbreaking work of video editing, even with our white-label service.
You can get your well-crafted explainer video seamlessly.
Check out our packages or try our video cost calculator to know the estimated budget for your video project.

