Table of Contents ×
- 1 What Is a Storyboard?
- 2 Popular Types of Storyboards
- 3 Why Do You Need a Storyboard for Explainer Video Production?
- 4 How to Create a Killer Storyboard for Explainer Videos
- 4.1 1. Understand the Importance
- 4.2 2. Understand the Process
- 4.3 3. Determine Your Goals
- 4.4 4. Create a Script
- 4.5 5. Create a Blank Slide
- 4.6 6. Start Drawing
- 4.7 7. Add your Script
- 4.8 8. Break it Down Into Slides
- 4.9 9. Define Your Visual Style
- 4.10 10. Make a List of Graphics
- 4.11 11. Sketch Your Story
- 4.12 12. Add Text Descriptions or Animator Notes
- 4.13 13. Present and Modify
- 4.14 14. Focus on Technical Details
- 5 Your Turn: Create Your Storyboard Now!
- 6 Mini FAQs on Storyboard
People tend to remember 65% of what they see, but only 10–20% of what they hear.
That’s one of the many reasons video remains one of the most effective tools in marketing.
After years of working on video projects for different industries, I’ve seen how powerful a well-made video can be.
But there’s one thing I always emphasize before any camera starts rolling:
Start with a storyboard.
It’s tempting to jump straight into production, especially with how easy it is now to shoot decent footage using just a smartphone, but a good video isn’t just about visuals.
A storyboard helps us lay out the flow, key messages, visuals, and transitions.
It keeps everyone on the same page, avoids costly revisions, and ensures the final video actually communicates what it’s meant to.
I’ll walk you through the basics of a storyboard, why it is essential, and how to create one for your project.
What Is a Storyboard?
A storyboard is a rough visual draft of your video.
Typically, we create a storyboard after the script for the explainer video is locked in.
Storyboards are organizers for your thoughts, but instead of using notes or bullet points, it uses visual sketches that could help you create a ‘draft’ for a video.
It gives you a clear picture of what’s coming before we animate or shoot anything.
Think of it as the Marvel comics version of your video—a simplified, scene-by-scene version of what’s coming, just like how comic panels map out action before it hits the big screen.
You can already spot the pacing, camera angles, transitions, and the structure of your message early on.
In my experience, this step is crucial for a few reasons:
- It helps us make sure the visuals match the script and tone.
- It gives everyone (clients, animators, designers) a shared reference.
- And it cuts down on back-and-forth later, which saves time and budget.
- Every animator I’ve worked with relies on a solid storyboard. Most even have their own revision policy based on it.
So, the clearer your storyboard, the smoother the entire process goes.
When we create storyboards for a project, we also make sure everything lines up: message, tone, visuals, and timing.
It’s our way of spotting problems early and staying on track.
In a nutshell, storyboarding keeps things organized and collaborative, and it’s one of the best ways to set your video up for success.
Popular Types of Storyboards
There’s no one-size-fits-all when it comes to storyboards for video production.
Different teams use different styles, depending on their workflow and the tools they prefer.
Here are three of the most common types of storyboards we often use (or see used) in explainer video production:
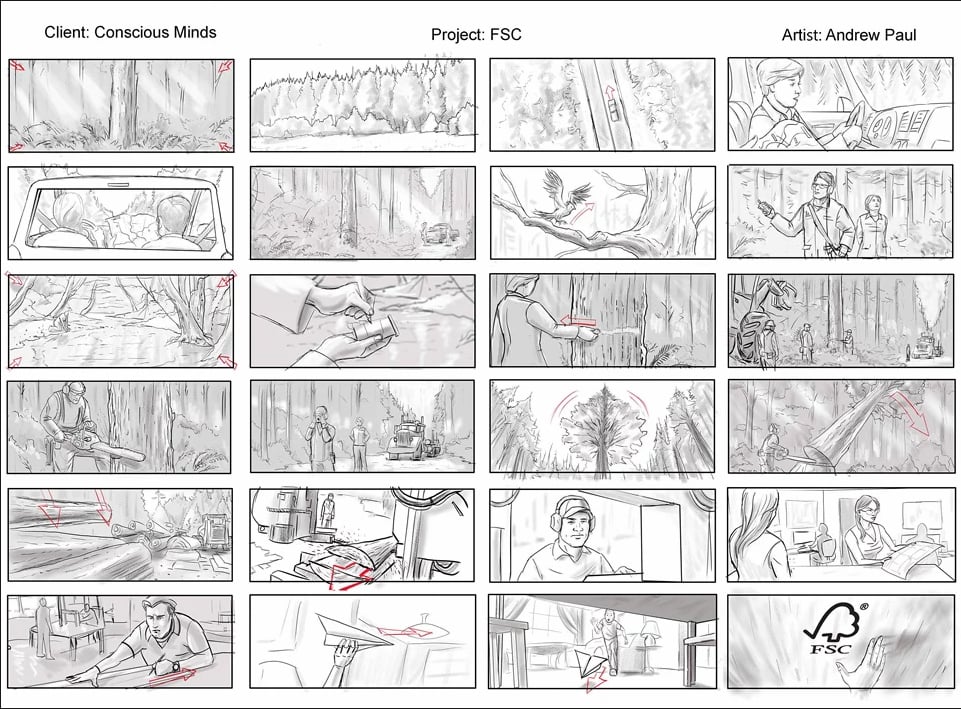
1. Traditional
These are your classic hand-drawn storyboards, usually done with pencil or ink.
They’re sketched out by a storyboard artist, often under the direction of the creative or production lead, using the script as a guide.
Traditional storyboards are great for brainstorming sessions or early creative meetings.
I’ve used them plenty of times when we need to lay everything out physically, whether it’s pinned on a wall or flipped through in a binder.
They’re simple, visual, and easy to rearrange.
Here’s an example of a hand-drawn storyboard:
2. Thumbnail
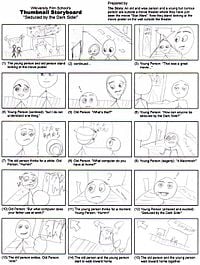
Thumbnail storyboards are like a rough draft of traditional ones, but smaller. Really small.
They’re often drawn in tiny boxes on just one or two sheets of paper (depending on the video duration).
The goal here isn’t detail, but speed and flow.
Thumbnails help us quickly block out how scenes connect and spot any awkward transitions.
Sometimes we use thumbnails as a warm-up before making a more polished version.
They’re super helpful when we want to see the whole video at a glance.
Take a look at the example below:
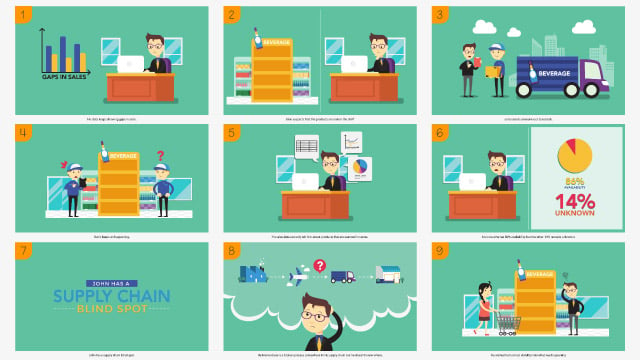
3. Digital Storyboard
This is the version we use most often now at Breadnbeyond.
Digital storyboards are created using design software like Adobe Illustrator, Photoshop, or storyboard-specific tools.
Our illustrators use tablets or computers to build scene-by-scene visuals that are easy to edit, share, and update throughout the project.
A static digital storyboard should look something like this (at least in its final stage):
There are a couple of subtypes worth mentioning here:
Animatics
An animatic storyboard is the advanced application of storyboards, where artists can animate their storyboards to a certain degree of motion.
Being a storyboard, the animation is, of course, in its most basic form, essentially jump cuts between scenes.
I’ve found them super helpful when a client wants to preview how the final video might feel in motion.
This is an example of animatics we made for our internal project.
Digimatics
Digimatics are, for lack of a better explanation, a digitally-made version of stop-motion videos.
The images are drawn in digital platforms, and then they are strung together to create a sense of motion by putting them in a sequence.
It’s another way to test out timing and transitions without diving into full animation just yet.
Why Do You Need a Storyboard for Explainer Video Production?
Another question might pop into your head: “Why do I need to make a storyboard while I can improvise along the way?”
Let me try to answer that question from several different perspectives.
It Helps you Organize Your Ideas Visually
The most fundamental benefit of creating a storyboard for your video projects is that you get to see your ideas visualized, rather than jumping in blindly to the production stage.
While a script can be enough to guide you through the pre-production process, having a storyboard can minimize the risk of mid-production hiccups, such as character revisions or re-shoots of certain scenes.
Having your ideas visualized and organized in a storyboard can also help you identify flaws in the way you share your ideas or stories through videos.
It’s a way to bring structure to your creativity. After all, a good video is all about good storytelling, and that starts with planning the visuals.
It Uniforms the Visions in Your Team
Explainer videos aren’t made in a vacuum.
There’s usually a team behind the scenes: scriptwriters, designers, animators, voiceover artists, and project managers.
Each of those team members might picture the scenes differently in their heads.
A storyboard gets everyone on the same page.
It shows exactly how the story will unfold, so there’s less room for miscommunication and fewer “Wait, I thought we were doing it this way…” moments.
When we work with clients, this step always helps the project run more smoothly because the expectations are clear from the start.
It Makes the Video Production Process Much Simpler
Once you have a storyboard, going into the video production stage is much simpler.
Your illustrators and animators have guidelines to follow in their work, and you have a tool to refer back to for revisions.
There won’t be more going back and forth about how a scene should be drawn or shot, how a character should be pictured, etc.
In my experience, the storyboard can have the power to make your team into a well-oiled machine.
It Improves the Effectiveness of Your Video
In storyboards, you’ll have several aspects of your videos that you wouldn’t have if you decide to only go with a script.
- Character designs
- Background objects
- Transitions
- Movements
While all of those things will only be sketches and arrows as guidelines, you will be able to see several issues way before you jump into the production stage.
Issues such as characters looking too cartoony or out of place, background object placements that are slightly off, character movements that appear awkward, and other elements that may negatively impact your video.
These things are much easier to fix at the storyboard stage than after production begins.
There are several other reasons why storyboarding is a no-brainer for anyone working in the video production industry.
It’s a Visual Note for Ideas
Another benefit I’ve found is that storyboards become creative references you can return to later.
If you sketched out an idea that didn’t make it into the final cut, or if you’re working on a similar project down the line, you’ve got a visual archive to pull from.
It’s a simple but powerful way to build your content library over time.
How to Create a Killer Storyboard for Explainer Videos
There’s no strict formula for creating a great storyboard, but after working on plenty of explainer videos, I’ve learned that a few key steps can make a huge difference.
Whether you’re storyboarding for a 30-second app demo or a 2-minute brand explainer, these steps will help you stay focused and make sure the entire production runs smoothly.
1. Understand the Importance
A storyboard allows you to test your idea before it costs you time and money.
I’ve seen many teams rush through this step, thinking it’s just for the animators.
But in reality, this is where we figure out whether the story actually works.
If the concept doesn’t land in the boardroom, it likely won’t land with your audience either.
The time you take with your video storyboard is a long-term investment.
2. Understand the Process
Looking back at my experience, I realize that no first draft of a storyboard is perfect, and it’s not meant to be.
A storyboard should be collaborative and a starting point for discussion.
Be open to feedback and changes, especially when working with a team of writers, designers, or animators.
Everyone brings a different perspective, and refining the storyboard together helps avoid bigger issues later in production.
Don’t move forward until the core team is aligned. It may take a few extra conversations, but that upfront clarity will save you time (and stress) down the line.
3. Determine Your Goals
Before you sketch a single frame, take a step back and ask:
What exactly are we trying to say? Who are we saying it to?
Yes, you can communicate more with a video than using text, but that doesn’t mean you should try to do everything at once.
I’ve seen teams try to cram too much into one video, and the message ends up getting lost.
I’ll help you break this down into the essentials:
Message
Your video needs one clear, focused message. This should come out of a brainstorming session with your team.
What’s the main point you want your audience to walk away with?
More importantly, think visually. If you’re just listing facts, people will tune out. Instead, ask:
How can we turn this message into a story? A scene? A moment?
Audience
Who are you speaking to? This shapes everything, from the visuals and tone to the platform where your video lives.
Your storyboard should reflect what matters to your target audience.
If it doesn’t resonate with them, it doesn’t matter how pretty or clever the animation is.
Type of Video
Knowing your message and the audience will help you pick the right video type.
Once you know your message and audience, choosing the right format becomes easier.
- Is it a whiteboard explainer to simplify a complex process?
- A live-action product demo to build trust?
- A short motion graphic for social media?
Where the video will live also matters.
For example, a blog video can run a bit longer, while a Facebook ad should be short and punchy.
Time and Timeline
People love video, but their attention span is limited.
Research shows the sweet spot is between 30 seconds and 2 minutes.
After that, engagement drops fast.
So, make every second count. A storyboard helps you keep things tight and purposeful from the start.
Remember, every second of your video will cost you something.
The faster you can share your message, the less you’ll pay for the video.
Budget
Of course, your creative decisions should align with your budget.
Luckily, creating a video is versatile. Cut costs in one area to help realize a goal elsewhere.
I’ve worked on projects where using animation and a great voice actor saved tons compared to live-action production with actors, sets, and multiple shoot days without sacrificing quality.
Your storyboard helps identify where you can simplify and where it’s worth investing more.
4. Create a Script
Once you know what you want to say and who you’re saying it to, it’s time to write your script.
By now, you’ve already outlined your key message and supporting points during brainstorming.
Your next step is to connect those ideas into a simple, clear story with dialogue or narration that flows naturally.
Here’s a tip: Keep it short and sharp.
The fewer words you use to deliver your message, the better. In video, less is more.
Instead of explaining everything, focus on how you can show your message visually, and your storyboard will help guide that.
Don’t forget to wrap things up with a clear call to action (CTA) to give your video real purpose.
5. Create a Blank Slide
Now it’s time to build your storyboard.
Start by dividing your workspace, whether it’s a sheet of paper or a digital canvas, into a series of boxes.
Each box will represent one frame or scene from your video.
You don’t need fancy tools or artistic skills. Stick figures are totally fine.
The goal is to get your ideas down visually, one scene at a time.
Here’s how to set it up:
- Draw or create boxes (usually 6–8 per page) to represent your video sequence.
- In each box, sketch a different scene that follows the flow of your script.
- Leave space below or beside each frame to add notes, dialogue, camera directions, or visual cues.
You can do this by hand or use digital tools like Google Slides, Milanote, Canva, or dedicated storyboard software.
Use whatever helps you stay focused and flexible.
Adding quick notes to each frame makes it easier for your team to understand your vision and keeps everyone aligned as you move into production.
6. Start Drawing
Now it’s time to bring your video to life visually. Even if you’re not an artist, don’t worry.
You don’t need to create a masterpiece. The goal here is to map out how your message will be shown.
While you’re making a storyboard, remember these key terms to help you get started:
- Shots: Individual scenes or clips in your video. These can be animated or live-action.
- Cuts: The transitions between shots, often where you leave your viewer with a key message or emotional shift.
- Storyboard Template: A layout where you draw a thumbnail of each shot and add script lines and notes underneath.
- Shot List: A breakdown that tells your videographer (or animator) exactly what scenes to create, including timing, framing, and content.
If you’re unsure about your drawing skills, stick figures are fine, too.
You can also use online storyboard tools to drag and drop basic visuals.
Color isn’t required, but using it can sometimes help convey mood or emphasis.
To make your storyboard useful for the production team, add enough detail to each scene, such as:
- What time of day is it?
- Where does the scene take place?
- Where are the characters positioned?
- Do you need props, animations, or text overlays?
Try to think from a 3D perspective, because your team will need to understand not just what happens, but how it should look on screen.
Once you’ve drawn your thumbnails, you can lay them out on a board or organize them digitally to present to others, whether it’s your internal team or a client.
7. Add your Script
Under each frame, add the relevant lines from your video script.
This gives context for your voiceover artist and provides clear direction for your animator.
When done right, your storyboard should feel a lot like a comic book.
Anyone who reads it should be able to follow what’s happening without needing you there to explain it
That’s the sign of a strong storyboard: It tells the story clearly, visually, and efficiently.
8. Break it Down Into Slides
One of the golden rules of creating explainer videos, especially for marketing, is to keep them short and to the point.
Based on what we’ve seen and tested, the ideal video length is between 1 and 2 minutes.
Go much longer, and your viewer retention rate will start to drop off quickly.
That’s why this step is important.
Once you’ve sketched your scenes in sequence, take another look.
Can you reorder them to improve flow? Can you cut out any scenes without losing key information?
Be as ruthless as you need to be. Every second in your video costs time, effort, and budget, so make each one count.
To move faster, you can start with stick figure sketches or placeholders.
Once the structure feels right, go back and replace them with more refined visuals.
Here’s a pro tip: Label your scenes with numbers.
It’s a simple habit, but it helps our team avoid confusion or mix-ups during production, especially when working with teams.
9. Define Your Visual Style
Now that your scenes are mapped out, it’s time to decide how your video should look.
This is where you lock in your visual style.
Are you going for something fun and cartoony? Clean and modern? More realistic and grounded?
Your choice here affects the tone, pacing, and even how you tell the story.
For example:
A cartoon style gives you more creative freedom. You can stretch logic, exaggerate movement, and use humor freely.
A realistic style might suit serious, professional, or emotional topics better.
Once your style is set, start designing your characters to match the tone. Ask yourself:
- Who is your character?
- What do they want?
- What actions do they take to get it?
- What outcome do they achieve?
This kind of character-driven thinking helps make your story more engaging because your audience connects better with people than with features or stats.
And if you’re not sure where to start, keep it simple.
Even basic, relatable characters can carry a powerful message when they’re tied to a clear story.
Related: 16 Types of Animation Styles for Explainer Videos
10. Make a List of Graphics
Before you dive into final sketches, take a moment to list all the visual elements your video will need (characters, objects, and backgrounds).
At this stage, these will still be rough sketches, not final designs.
But having a list helps you stay organized and ensures you don’t overlook anything during production.
Since you’ve already defined your visual style, you should have a pretty clear idea of what each element should look like.
Now it’s just about mapping it out:
- How many characters will appear?
- What key props or objects do you need?
- How many different backgrounds or scenes will you use?
Creating this list upfront will also save you a lot of back-and-forth later, especially if you’re working with designers or animators.
11. Sketch Your Story
Now it’s time to put the full story together visually.
Using the graphics and shot list you’ve already prepared, start sketching out your video scene by scene.
In this stage, you’ll see the pacing, transitions, and narrative arc take shape on the page (or screen).
If you’re working digitally, you can speed things up by copying and pasting pre-made graphic elements directly into your storyboard template.
This not only saves time but also keeps your visual style consistent across frames.
Sketching the full story also gives you a better sense of flow.
If something feels off, it’s much easier to spot and fix at this stage.
12. Add Text Descriptions or Animator Notes
To wrap up your storyboard, add supporting notes under or next to each frame.
It’s the icing on the cake for your storyboard to guide the creative team, such as animators, graphic designers, and voice actors.
These could include:
- Camera directions (e.g., zoom in, pan left)
- Scene details (e.g., background noise, lighting)
- Voiceover cues or script lines
- Animation instructions (e.g., character enters from left, text appears with bounce)
These notes are useful when you’re working with a larger team.
They help ensure that everyone, from animators to voice actors, understands your creative vision without constant check-ins.
Pro tip: Encourage your team to give feedback during pre-production and early production.
They’re the ones hands-on with the execution, and their insights can help you avoid bottlenecks or unnecessary revisions later.
13. Present and Modify
You’ve got your first draft—nice work! But don’t stop there.
The first version is rarely the final one.
It’s important to bring your whole team into the conversation.
Yes, the whole team!
Your marketing team needs to confirm that the story aligns with the brand message and campaign goals.
Your production team should review whether everything is technically feasible within the timeline and budget.
Invite feedback, ask questions, and listen actively.
Your job now is to take the best suggestions and refine the storyboard so it’s both creatively strong and realistically executable.
Use the back of your printed boards (or a comment section in your digital file) to jot down everyone’s input.
You’ll thank yourself later when revisions start piling up.
14. Focus on Technical Details
As mentioned, storyboarding for a video is vital to marketing success.
Even if your story and visuals are solid, technical clarity is what makes production run smoothly.
To avoid misunderstandings, make sure your storyboard includes the key specs your creative team will need:
Aspect Ratio: Use the correct frame dimensions (typically 16:9 for most platforms, or 4:3 for special formats). This helps you visualize whether all elements fit naturally within the screen.
Camera Direction: Want a close-up? A wide shot? A slow zoom? Mark these in your storyboard so your production team can prepare the right gear and setups.
Special Effects: If you’re planning transitions, VFX, or animated overlays, clarify them early. Some effects might need specialized tools or additional hands on deck.
Getting these technical notes in from the start avoids surprises later.
It also helps your team stay efficient and aligned with your vision every step of the way.
Your Turn: Create Your Storyboard Now!
All in all, storyboards help a lot with your video production process.
It doesn’t matter whether it’s a simple, professional-looking animated explainer video or a live-action film.
Even Hollywood directors still rely on storyboards to pitch and plan their stories.
Every decision you make at the storyboarding stage affects your production team, your timeline, and eventually your audience.
That’s why sharpening your skills here will pay off in every project you work on.
Here’s what a good storyboard can do for you:
- Help you organize your ideas visually
- Align your whole team around one clear vision
- Catch potential problems before they turn into costly revisions
- Make the production process smoother and faster
But the truth is, not everyone has the time (or energy) to sketch out their ideas.
That’s where we come in!
At Breadnbeyond, we’re a team of creative and experienced visual storytellers.
Not only can we help you draw your storyboard, but we can also bring it to life in the form of animated explainer videos.
Need something scalable? We also offer white-label partnerships for agencies and content teams.
Mini FAQs on Storyboard
1. What is a storyboard for a video?
A storyboard is a visual plan that maps out each scene of your video. Think of it like a comic strip—it shows what will happen, how it will look, and what will be said. It helps everyone involved stay aligned before production begins.
2. How do you storyboard an explainer video?
Start by understanding your message and target audience. Then write a short, focused script. Once the script is ready, divide it into scenes and sketch each one, either on paper or using digital tools. Add supporting notes for visuals, animation, and voiceovers to guide your team through production.
3. What are the seven steps of storyboarding?
While the process can vary, a solid storyboard typically includes:
- Define your goals and key message
- Write a simple, effective script
- Break the script into scenes
- Sketch each scene (stick figures are fine!)
- Add visual and audio notes
- Review and revise with your team
- Finalize for production
Want help with any of the steps above?
At Breadnbeyond, we’ve created over 3,000 explainer videos—storyboarding included.
We’d be happy to help you plan your next one!
Want to know how much your video might cost?
Try our free Video Cost Calculator to get a quick estimate and plan your next project smarter.

